Adventure Chronicles - Egyptian Treasure Walkthrough
Lost Pharaoh’s Treasure
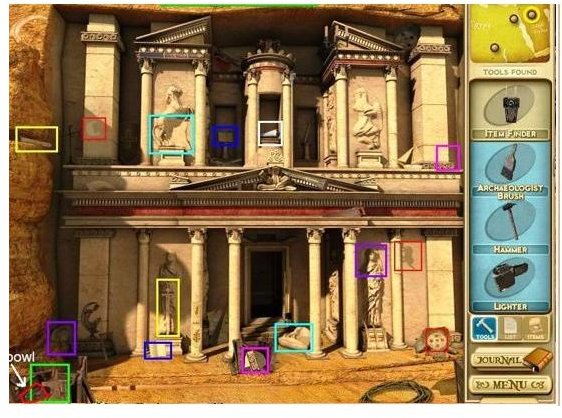
Let’s start at the Lost City of Petra. Break all the crates that you can in order to get the Geocache item - Anubis’ bust, bowl, and column piece. Dusting the columns will get you a crescent moon and elephant. Now for the trickier part; to get the map of Egypt, place the stone book on the podium and replace the column piece as well as the horse leg, the statue head, and the broken sword.
Then head on to the Fortress of Babylon where the Geocache item is a Roman Centurian Helmet again, break vases and burn baskets and rugs to get the pocket watch, the gravy cup and the biscuit can. The sun symbol will be found only if you dust the walkway above the music book, and getting the four coins means you have the break the keystones in each four arches.
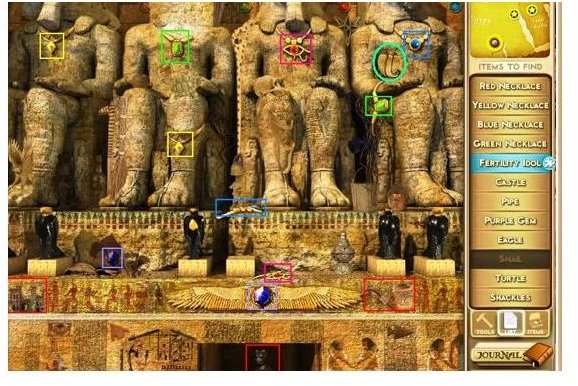
When you’re done with that, head to the Temple of Ra with the Cobra Idol as your Geocache item. You’ll need the wings to get the pipe and the blue castle. The blue gem is inside the vase so break that. Finally, attaining the Fertility idol means you have to place the necklaces on the statues in order of yellow - green - red - blue. The blue gem has to be affixed to the wings in order for the compartment to open and the idol to come out. After this, head on to the Great Sphinx.
This time you’ll find the Geocache item - a Napoleonic cannonball - on the upper left palm tree. Dust the statues to get the camel and the eagle before breaking the crate that has the digging spade. Now you have to arrange the stone tables by placing these items from right to left in the center: 5 feathers, 4 beetles and 3 feathers.
The Egyptian Treasure
Arriving at the Hall of Records, you’ll need to grab the sacrificial dagger at the left corner of the bookcase for the Geocache items. Break the vase on the lower right portion of the screen as well as the cup opposite it to get the binoculars and spider. The moth will be found after dusting the sand receptacle.
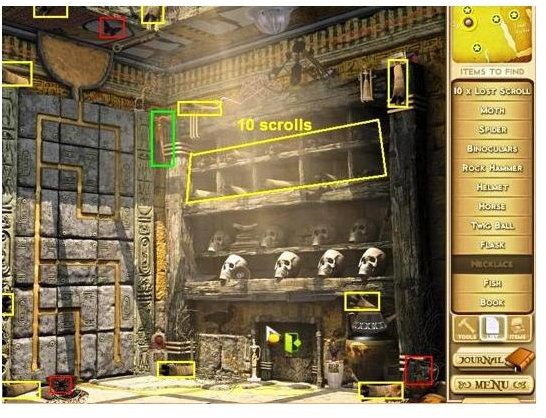
To get to the new entrance, you’ll have to place 10 scrolls in various cubbyholes and make sure the sand has no leaks. Unfortunately, this puzzle is randomized so we can’t give an exact area for each scroll. A screenshot has been provided however.
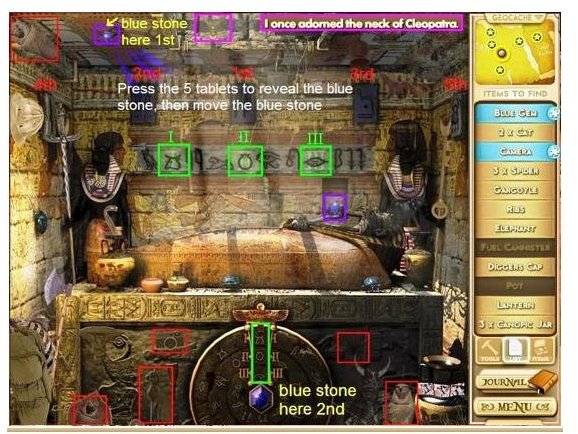
Once you’re done with the puzzle you can now enter the Lost Tomb, where you’ll look for an Antique French Necklace (left of the hat) and 3 Canopic jars by burning webs and breaking a vase. The cat and the camera can be found by dusting the center wheel, and adjacent to that is the gargoyle. Brush to claim it. Now for the blue gem,you’ll need to press the right symbols in order so do it as: two feathers, 2 beetles, snake, feather and beetle. Once you get the blue gem, place it in the upper left portion of the ceiling.
Finally, the treasure will be attained if you turn the outer ring to the cow and subsequent ones to the jar and liplike symbol. Place the blue gem you found earlier in the center and out will pop your treasure.
Mayan Treasure
For the Mayan Treasure, begin your quest at the Mayan Museum, where you’ll pick up a silver necklace as part of the Geocache collection. You’ll need to dust the center edge and under the word Exposition to get to the leaf fossil and the horseshoe. Now, to get the glass skull you’ll need the key (which you’ll grab by burning the newspaper), replace the skull with the wheel artifact on the table, and hurry on to the Dig Site. At the Dig site, burn the bush to your left to retrieve a pair of Jade Earrings for the Geocache collection. Now use brush on the entire area inside the ropes. Burn the bushes around you to get the sun and the magnifying lens, then break the rocks to get the mask and the millipede. Finally, use the box cutters to open the bag and get the red diamond.
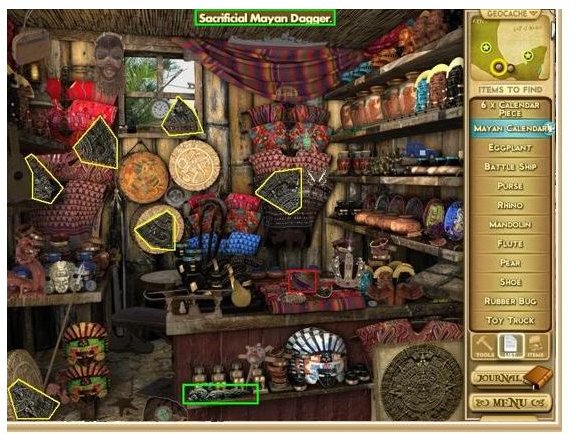
As you journey on, stop by the souvenir shop and get the Sacrificial Mayan Dagger on the counter for the geocache (again). Then break the bowl to get the eggplant. Finally, click on the calendar picture. Place the calendar piece on it and rotate it until it fits. Sew this with the other pieces and when you’re done grab it and go.
Mayan Temples
After getting the calendar, make your way to the Mayan temple where you’ll need to light torches and squish all the scarab beetles around you. The geocache item this time is the Mayan Idol of a Sun God. You need to dust all sides of the altar and the left edge to get the warrior, elephant, castle and handprint.The painted gourd is inside the left box and the red diamond is embedded in the center altar.
From there, get to the temple of Tulum and grab the Mayan Sun Dial. Now you need to get 2 stone tablets and 2 ammonite fossils. To get the fossils, break the rocks on the side of the stairs and at its bottom. For the stone tables, you have to move the center tile puzzle around to show a man holding fire. The tablets will be places on the niche by the door to get you inside. Other items like the crystal chunk book and iguana can be attained by burning the bush, breaking the rock, and box.
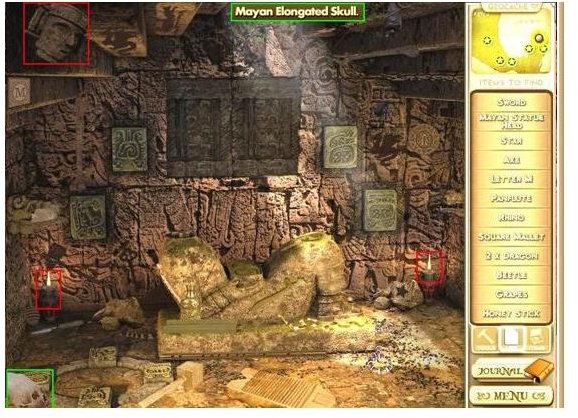
Once inside the temple, light the vases with your lighter and get the elongated Mayan skull. The star is inside the rock to your right, and the sword is hidden with dust on the statue. Place the head on the statue and click on the symbols N S W E according to which direction the face is turned towards.
Blackbeard’s Treasure
The map here is pretty simple, for the Shipwreck. Get the Geocache (which is the sextant) Grab the two iron keys inside the lamps by the side of the door and use them to get the map from the hatch.
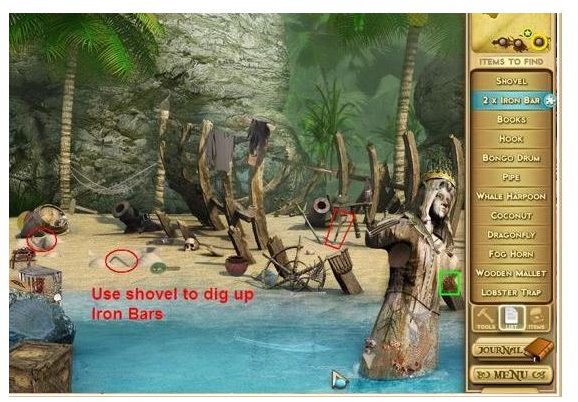
Once you have the map, head on over to the beach and get the spanish doubloon, as well as the two iron bars (found in front of the left barrel and the maraca).
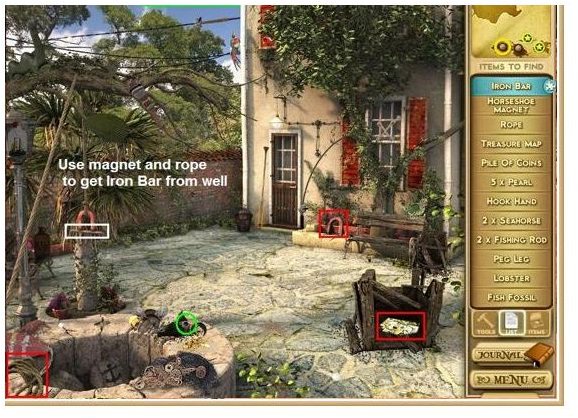
Then make your make to Blackbeard’s Home and get the treasure map by breaking the box to your right. Now - using the the rope on the tree branch - attach a magnet to it to get the rope. The Geocache here is the First Mate’s Ring inside the bottle
Now on to Blackbeard’s Cove. Here the Geocache is Blackbeard’s Pistol; it’s in the barrel. The Treasure Chest is hidden in a bush, so burn that. The figurine is also hidden in a box as well as the pocket watch. Now the key you need is just below Blackbeard’s belt, but you need to dust it first. Finally, for the coin - use the cannonball stuffer on his hat, then on the right cannon.
The Final Treasure
Begin at Oak Island NS, where you’ll need to look for items like the Gold Serving Plate by burning bushes and breaking boxes around the entrance. When you’ve gathered all your materials, place the dynamite at the entrance and and place the fuse coil around it. Light it up and watch the entrance go BOOM!
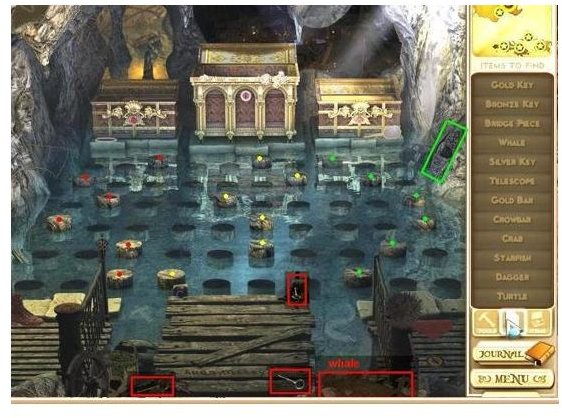
Once you’ve cleared the path, you’ll finally enter Blackbeard’s Cave. At the edge by the right is his hat, which is the Geocache item for this map. Break the rock and the bottle to get the whale and a key that you need. When that’s done, let’s focus on the puzzle. The goal here is to create a path to the three chests. The first row will be for the first number of pilings, which basically just continues on. You’ll have to replace each dock piece before fitting your combination in.
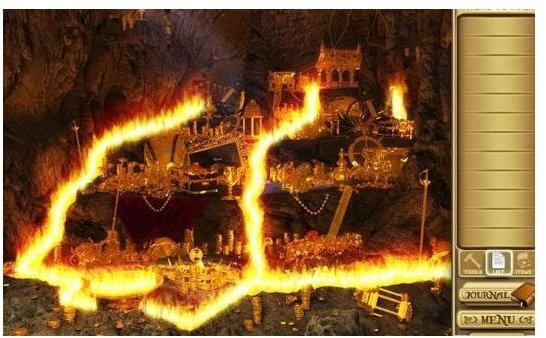
For the left chest, use the silver key and the combination 3-3-1-2-1-3. The right chest needs the bronze key and the combination 1-2-3-3-2-1. Finally the center chest uses the gold key and the final combination of 1-3-3-2-4-3. All the chests will be empty but don’t worry; get to the opening and use your lighter on the gold bowl and voila, Blackbeard’s Treasure!
This post is part of the series: Adventure Chronicles Guide
More articles about Adventure Chronicles.