Black Ops Call of The Dead Guide: How to Survive the Newest Black Ops Zombies Map
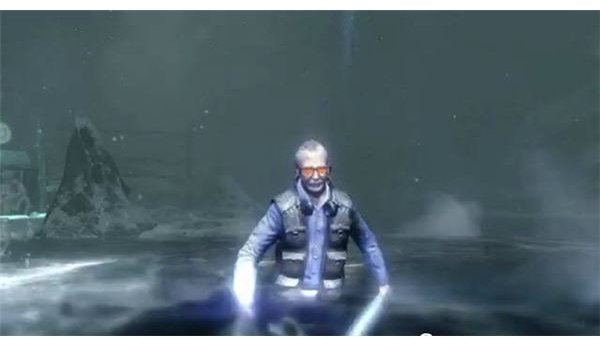
George Romero: The Director
George is the most obvious of all the new features in Black Ops Call of the Dead. When the game begins a lightning bolt hitting the water at the character spawn point signals Romero’s entrance. He is carrying a stage light, which he will swing at you if you get too close. Usually he will follow the players around slowly, making threats. Occasionally you might find you have triggered his range mode by injuring him, you can calm him by leading him into water (there is a lot of it around) or shooting him with the V-R11.
When in rage mode Romero will power up any zombies near him making them slightly faster and sometimes electrifying them.
Rinse and Repeat – Killing George
When you play Call of the Dead for the first time, killing Romero may seem impossible. Every time you injure him, or he gets close enough to land a blow on you he goes into rage mode and you need to bring him to water to calm him.
Killing Romero takes a lot of time because he has a lot of health, in fact he gains a certain amount of health per player – so if there are four of you he is harder to kill (adversely if you are alone its easier). You can tell how injured he is by the light he is carrying; when he is near death it should be orange. The best way to take a lot of health off of Romero is by using a death machine on him, but this also depends on where you are when you get the death machine; if you are not near any water or are surrounded by zombies then don’t anger Romero too!
If you are lucky enough to get a death machine at the end of the round and have a crawler then lead George to water and let him have it with the Death Machine (the rumor about him healing in water is not true it only calms him).
Using Pack-A-Punched weapons on Romero works well too because they are much stronger than the regular weapons.
If you kill Romero he will drop a death machine which, to be honest, is not worth the hassle unless you are unlocking the achievement for killing him. On the other hand if you have already unlocked the Ensemble Cast and Stand-In achievements and kill Romero he will drop a Wunderwaffe. He will also drop a free Perk; if you already have four perks this will allow the free one to be your fifth.
Note: Shooting Romero with the Wunderwaffe could actually increase his health.
Once you have killed Romero he will disappear back into the water, but he will return after a shot period so you can repeat the process all over again.
Making Use of the Zip Lines
The Zip Lines are another first for a Black Ops zombie map. There are two zip lines – one goes from the top of the ship to the stairs at the lighthouse and the other from the top of lighthouse to the ship. In order to use a zip line the destination area must also be unlocked.
The zip line from the ship to the lighthouse is invaluable when the Mystery Box is in the ship below the steering wheel. If you are using the box and get crowded you can dash up the stairs and zip away.
Caution: Zombies can use the zip line after you but ther is a tiny delay that gives you time to run.
Dead Shot Daiquiri
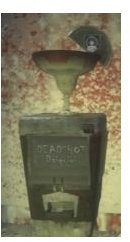
Dead Shot Daiquiri is the new perk in Black Ops Call of the Dead. It can be found at the very top of the lighthouse and costs 1500 points. Deadshot Daiquiri resets the auto-aim from the torso area to the head – effectively allowing you to get a headshot every time you fire. It is very helpful especially if you are hoarding Zombies in an area as you can shoot into the hoarde with a SMG or assault rifle and quickly kill them.
Pack-A-Punch
The Pack-A-Punch machine will only spawn once the power has been turned on. The power switch is located by the mystery box spawn in the first part of the ship that you reach. It is at the top of the ship and a door must be opened to gain access to it.
For the first time in a Black Ops zombie map the Pack-A-Punch machine will spawn at various locations around the map instead of having a permanent location. It is always in water, I would assume this is so George will be calm if he is near you as it takes a little time for a weapon to be upgraded and facing him enraged and weaponless would be problematic to say the least .
The lighthouse will show where the Pack-A-Punch machine has spawned by shining a bright red light onto it. When it is just about to spawn the red light from the lighthouse will spin around before pointing to the Pack-A-Punch Machine.
The V-R11
The Call of the Dead map introduces us to the V-R11. The V-R11 allows you to turn zombies back into humans. A recently converted human will attract a lot of attention from nearby zombies and George, unless there is a player even nearer to them, so they can be a great distraction while you make a getaway.
Shooting one zombie with the V-R11 three times will make it explode. Considering the V-R11 has very little ammo this is a pretty pointless move unless you are unlocking the Stuntman achievement.
The V-R11 is most useful for calming George, although he will only be calmed for a short period it will give you time to find a body of water to permanently calm him with.
When upgraded using the Pack-A-Punch machine the V-R11 becomes the V-R11 Lazarus, making it stronger and giving it more ammo. Shooting a teammate with it will make any nearby zombies ignore them for a few seconds making it perfect to quickly save a severly injured player.
The Sickle
The Sickle is in one of the worst possible locations on the map. In order to get to it you must make your way to the very bottom of the light house and open the door facing an icy pool of water – on the right of this now open door is an icy slope and at the bottom of this slope is the Sickle. It’s chalk outline almost blends in with the wall so it can be pretty easy to miss.
The Sickle is a very effective but also very expensive weapon at 3000 points. It is one-hit-one-kill up to round 13 but the cost is so high that many would say it is not worth it. Actually getting the Sickle also leaves you in a very difficult position tactically as that patch of icy water at the back of the lighthouse is a deathtrap and getting out of it can be very difficult and slow with all the water.
The Flinger
The Flinger will only work once the power has been switched on. It is located on the ship below the power switch. It is a little platform that will ‘fling’ a player across the map to the lighthouse. This also requires that the obstacles to the lighthouse be removed first. If a zombie is on the Flinger with you it will be thrown across the map too. There is a cooldown period of around ten seconds before another player can use the Flinger. The Flinger can also be used by a downed player.
The Flinger is great for getting out of a tight spot – which you may well find yourself in if you spend a lot of time on the ship. Lots of zombies in a small space like that usually make it difficult to avoid them but just jumping onto the Flinger makes for a quick escape, just don’t leave any teammates behind!
References
All images are screenshots from Call of Duty Black Ops.