Roboenza is spreading like wildfire, driving robots into a killing frenzy. It’s up to Mega Man and Proto Man to put a stop to the most dangerous of these robots and help Dr. Light come up with a vaccine. Oh, and stop Dr. Wily from taking over the world while they’re at it.
Once a Mad Scientist…
Anyone who’s played a Mega Man game before can probably guess that Dr. Wily’s claims of innocence in the game’s opening are false. Well, it’s not much of a spoiler, especially since the mad doctor has feigned innocence in at least two other games. Dr. Wily is up to his old tricks, and this time he’s crafted a virus capable of driving robots insane. Mega Man and Proto Man spring into action to stop the threat while Dr. Light creates a vaccine.
This guide was created while playing on normal mode, with Mega Man. While Proto Man does take more damage, it may actually be easier to deal with the bosses, since sliding under a leaping boss gives you more room for error than simply running underneath them. That, and Proto Man’s shield can be a huge help against some projectiles.
I’ll list the bosses in sequence, with each Robot Master’s acquired weapon being beneficial against the fight with the next. Of course, you can start with any Robot Master that you wish.
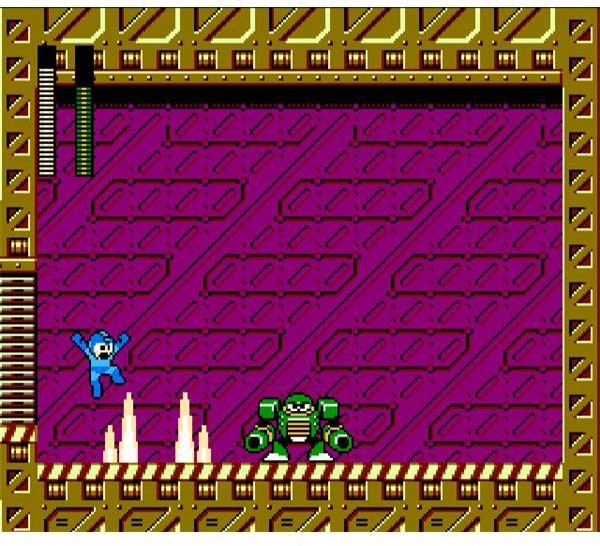
Pump Man
Pump Man works with a very simple pattern. First off, he’ll form a barrier of eight bubbles, then proceed to hop around a
few times. You’ll have only a brief window to run underneath him, unless you’re playing as Proto Man, in which case you can simply slide right underneath. Following that, he’ll leap into the air to fire off whatever bubbles you haven’t destroyed. The bubbles will spiral outward, giving you plenty of room to stand in between bubbles. Fire away with the mega buster after he fires off his shield. If you have the thunder wool from Sheep Man, just unload on him at any time. Sheep Man’s weapon will eat through Pump Man’s defenses in a flash.
Solar Man
Mini-Boss: Suzak and Fenix
These two birds will flank you on either side of the room; one up high, and one near the floor. The one at the top of the room will toss three small balls of flame that will arc toward the floor, with the center flame centering on you. It may do this one to three times, then the birds will switch altitudes or cross to the other side of the room from where they were. When they switch sides, the birds will shift into firey projectiles that you can easily jump over. The birds really only have three movements, but no real patterns. If you don’t mind taking the chance with your ammunition, the water shield will destroy the birds pretty quickly.
Solar Man
Solar Man will hop around his stage, dropping the flaming orb on his head every here and there. When the orb hits the floor, it’ll split into a pair of shockwaves that will travel in each direction. If you hit him with any attack other than the water shield while he’s standing still, he’ll absorb it and use it to make his solar projectiles bigger. The water shield is his weakness, and will put out the orb on his head momentarily. Normally, Solar Man will try to jump on you if he gets the chance, but f you stand on the right side of the leftmost platform, there is a good chance he will leap only to the spot to your right. This way, you’ll only need to jump over his projectiles. In fact, this puts you in a great position to just use the mega buster with little risk to your energy.
Chill Man
Chill man works without any real pattern, and tends to just run, jump, and attack randomly. He’ll fire one or two ice projectiles that will arc toward the ground, leaving ice spikes there temporarily. If the shot hits you in the air, it will freeze you for a moment, giving him an opportunity to attack you freely. Your best bet is to simply launch solar blaze shots all over the place, since he won’t jump high enough to avoid the shockwaves that the solar blaze shots cause. The best strategy is to blow Chill Man away before he can do the same to you.
Nitro Man
Nitro Man can toss out wheel projectiles, either straight ahead or at an upward arc. The wheels will travel along the

ground where they land, up the wall, and will fall down toward you before disappearing. He can also transform himself into a motorcycle, during which time he will attempt to run you over. If he does a wheelie in motorcycle mode, that’s your warning that he’ll climb up the wall and toss a pair of wheel cutters at you. You can avoid the bouncing wheel cutters and fire at him when able, or you can switch to the chill spike you got from Chill Man and lay ice spike traps for him to run over. Hitting him with the projectile directly won’t do much damage, even if it does freeze him, so stick with the spike traps.
Commando Man
Commando Man is a big guy, and as one might expect from a boss that big, he has the ability to stun you if you’re on the ground when he lands a huge jump. He’ll also launch rockets that are capable of changing direction to hit you when they pass over top of you. These same rockets will cause shockwaves when they hit the floor or walls. Leap over any low flying rockets, and run underneath Commando Man when he jumps to avoid the rest. He’s easy enough to dodge around, and if you switch to his weakness -the wheel cutter- you can use it to knock out his projectiles and deal him some major damage.
Blade Man
Mini-Boss: Castle Robot
With the water shield, this mini-boss is a piece of cake. The mini-boss consists of three pairs of eyes that will appear occasionally from behind shields. The two towers on the sides will toss bombs at you, while the pair of eyes in the center will open the door to send out spiked platforms that you can jump on. Each use of the water shield should be just enough to take out a set of eyes, making this the easiest mini-boss of the game.
Blade Man
Unlike the mini-boss, Blade Man will be a pain in the rear… Blade Man will start by leaping to the right wall and flinging a trio of knives, with the middle one aimed directly at you. He’ll then head for the ceiling, then the left wall, tossing his knives at each stop. He’ll jump to the floor, aiming for you, and stay there for a moment before repeating his pattern. Occasionally, he’ll skip the floor and head back to the ceiling. The blades are fast, but can be sidestepped with practice. If you can get the timing down, the commando bomb will be your best weapon in this fight. Fire it while he’s in the air, changing the direction of the projectile to hit the ceiling when he’s heading there. The trick to dealing him the most damage is to hit the wall or the ceiling so that the shockwave hits Blade Man, instead of hitting him directly with the bomb.
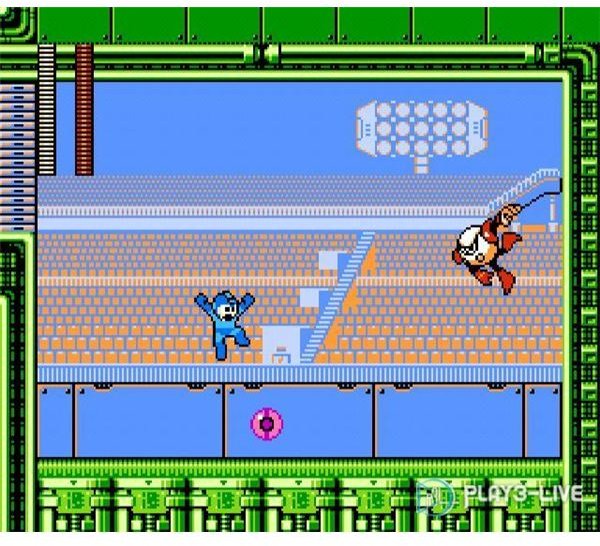
Strike Man
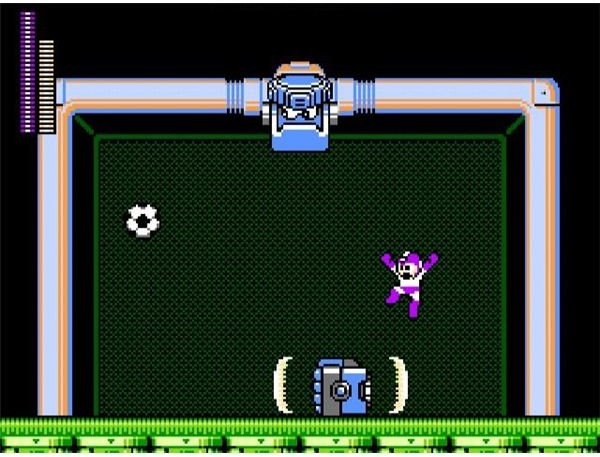
Mini-Boss: Goalkeeper Robot
This mini boss will appear twice in the stage, and isn’t as tough as it might look. The robot head at the top of the room
will look to the left or right, and a soccer ball will fly out from that direction. Dodge the ball and hop onto the giant fist that will appear to knock the ball around. The fist will take you high enough to get some shots in on the goalkeeper’s face. It will repeat this attack from the other side of the room, then both fists will attack at once, attempting to crush or stun you by slamming into the floor. Instead of dealing with the fists, however, you can simply use the same tactics used against Blade Man and hit the goalkeeper with commando bomb shockwaves.
The second time around, the arena will have electrical barriers half way up on either side. During the attack with both fists, one will rise so that the other can slam you into the electrical barriers. Again, commando bomb shockwaves will do the job.
Strike Man
Strike Man will start off by hurling a ball at you. The ball will head toward you, bounce off of the floor, and bounce around until it has made a couple more attempts to hit you. During this time, Strike Man will roll himself up and make two jumps in your direction. Strike Man isn’t tough to dodge, but his projectiles might be a little difficult to manage. The weapons of choice in this fight are the triple blades. They’ll cut right through Strike Man’s attacks, and will deal some hefty damage to him if you’re close enough for all three blades to strike.
Sheep Man
Mini-Boss: Octobulb
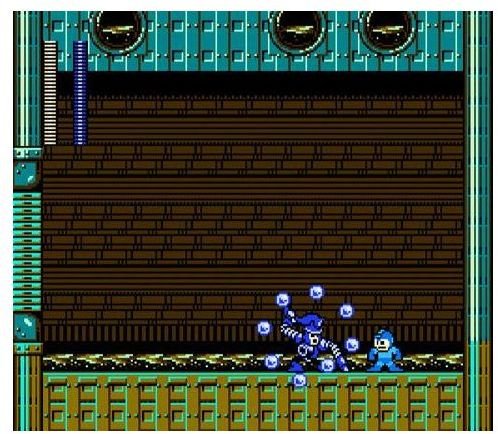
This mini-boss can be annoying, but isn’t all that difficult. The light bulb shaped boss with the odd octopus face will send out a pair of smaller, floating creatures that will slowly move toward your position. If you destroy them, it will send out more. Destroy only one, and you’ll only have to avoid one. Run along the treadmills on either side of the room to send power to the boss, causing blocks to appear in four separate locations. Using these, you can hop up to the boss’s level to fire at it. The mega buster works well enough here. After a short time, the blocks and the boss will fade, and electrical pulses will travel along the cables leading from the floor to the boss. The pulses will take any path they can to try to hit you. Reactivate the boss by using the treadmills, and keep up the fire until the boss is destroyed.
Sheep Man
This odd boss is rather simple to deal with. He will throw out a bolt of lightning straight at you, then disperse into four small thunder clouds. Hop over the bolt, and keep an eye on the clouds. Each will flash and drop a lightning bolt to the floor, one at a time. The bolts will spread slightly over the floor, so try to keep at least three Mega Man lengths away from each cloud as it strikes. The fourth cloud will also send out a ball of lightning in each direction, along the floor. Sheep Man will then reform and perform his pattern over again. With the rebound striker, you can deal Sheep Man heavy damage. In addition, the ball can actually knock Sheep Man out of his cloud form if the ball hits the right cloud.
Weapon Archive a.k.a. Retro Robot Masters - Part 1
In the first Wily Stage, you’ll come across three boss rooms containing three robotic nodes each. Each of these nodes represent a boss from Mega Man games 1 through 9, and each has its own weakness. The nodes will attack one at a time, and will perform a couple of attacks before switching with another node.
In the first room, the node on the left and in the middle are weak against the wheel cutter, and the one on the right is weak against the triple blade.
The left node will move to the right side of the room and fire lightning bolts that in threes. All can be jumped over. The middle node will drop straight down and fire a beam capable of bouncing off of surfaces, then hover around in a figure eight. The rightmost node will drop to the right, call up a leafy barrier, then rain down leaves before launching the barrier at you. The falling leaves can be sidestepped, and the shield can easily be jumped over.
Weapon Archive a.k.a. Retro Robot Masters - Part 2
During the second encounter, the weaknesses are as follows: solar blaze, rebound striker, and water shield.
The node on the left will drop to the right, throw a ring, then jump and throw another ring right at you. Each ring will return to it, causing the first to rise toward him, and the second to descend. Move toward the node to avoid the first ring, then away for the second. The center node will land right in front of you, toss out a pair of bombs, then jump at you and repeat. Just run underneath its jumps to avoid the second set of bombs. The final node will toss out a trio of flames that spring up into pillars. Stand on the far left to avoid the most of this attack.
New Section TitleWeapon Archive a.k.a. Retro Robot Masters - Part 3
In the final room, you’ll need to use the chill spike, commando bomb, and thunder wool. This will be the trickiest room.
The node on the left will drop to the center, cause a wave of icy pillars, leap at you, and repeat. The waves take some timing, but can be jumped over. The middle node will drop right in front of you to deliver a quick slash, and leap after you to attack again. Only the spike trap set by the chill spike shot can really hurt him, so for sake of ease you’re better off using the mega buster. The rightmost node will call up four mini tornados from underneath you. These will track your movements somewhat as they’re appearing, and cause you to rise to the ceiling when you jump. You’ll likely have to shift sideways in the air to avoid them. The node will rise and perform this trick again, then move to the other side to attack twice more. A well timed thunder wool can destroy this node in a single shot.
Crab Puncher
The boss will appear on the right, with spike bottomed platforms hovering in from the left. The boss consists of two claws and two eyes, and constantly moves toward the left side of the screen. Firing at the boss’ main body will knock it back some. The claws can be launched forward, and will also protect the eyes if those are being attacked. Stand on a platform and hit it right in the middle of the face with commando bombs, but don’t waste bombs if the claws are covering the eyes. Alternately, thunder wool can quickly dispatch each piece of the boss. During the fight, you’ll also need to watch out for a barrage of bubbles which shoot out from the middle of the boss’ face. When the crab’s mouth starts to bubble, run back and forth across the floor to avoid the attack.
Block Devil
Now this… Is a boss. You’ll have to keep track of a certain order as the boss puts itself together from a collection of dark purple blocks. Stand on the rightmost set of three light purple blocks, and jump the eigth, eleventh, and the last block that comes your way. When the final two blocks are moving to form a square in the middle of the room, fire off a thuunder wool to damage that eye that appears. The block will rise and launch an orb at you, which will explode into a spray of shrapnel. Jump to the right slightly to avoid the orb, and maneuver left in the air to avoid the shrapnel. The block will drop to your level to fire two horizontal beams, flashing slightly before it attacks. Then the block will disassemble itself in the opposite sequence that it assembled itself in.
Switch to the triple blades and wait for the eye to reappear in the lower left corner of the room. It will cause the darker purple blocks to shoot out a few spaces toward the center of the room in a counterclockwise wave pattern. After the blocks to your left pop up, move to the left to avoid the blocks that will shoot out from the right wall. During this time you’ll have plenty of opportunities to dire blades at the the eyeball.
Robot Master Repeat and Dr. Wily - Part 1
Prior to your fight with Dr. Wily, you’ll enter a room with a series of transporters. Each will take you to rooms containing one of the eight robot masters. See the strategies above to deal with the bosses a second time around. When finished, take the final transporter to Dr. Wily’s chamber.
You’ll begin the fight facing Wily’s usual skull faced battle machine. It will launch small seeking missiles and larger missiles that can be used as platforms. Hop up on the moving platforms and use solar blaze shots to destroy the smaller missiles and damage the eye sockets.
The second form sees Wily moving much more, and launching large orbs that are aimed toward your position. During the fourth orb, Wily will drop to the floor and try to entrap you with a smaller, seeking orb. Blast your way out of the cage if the orb hits you, then get underneath Wily quickly to avoid the next devastating attack. The water shield is the weapon to use, though it only works well when Wily is near the floor.
The Final Fight - Dr. Wily and His Clone
Dr. Wily will show up with a robotic duplicate (easily distinguishable by its grey complexion) and attack you in tandem with it. The first attack is to send an energy ball down, across the room, and back up to the other Wily in a “U” shape. Following that, the orb will be passed back and forth a couple of times, showering the room with more balls of energy. Stand under the real Wily, to his right or left side, to avoid the barrage.
The second attack is to send a cluster of five smaller projectiles that aim for your position as they cross to the far side of the room. The projectiles will stay there for a moment before making a second pass at you, then return to a Wily when they reappear.
Either the chill spike (the projectile, and not the spikes) or the mega buster will work well against Wily, but don’t hit the robotic Wily or it will strike with an unavoidable attack. This fight is what you’ve been saving E Tanks and M tanks for. The other thing to note about this fight is that gravity will be reduced, like when you’re jumping around in water. This is a big help in avoiding Wily’s barrage of projectiles.