Part 1 of a series of articles providing the solution to every puzzle in the new Professor Layton and the Unwound Future for the Nintendo DS.
Professor Layton: Puzzle Answers for Puzzles 1-5
**
Puzzle #1 - Party Crasher:
Goal: Help the guard to locate the table with the uninvited guest.
Solution: The clues all point to the table with the red flower and red tablecloth. Pick up the guard with the stylus and drag him to the table on the upper right with both a red tablecloth and a red flower to solve this one.
Puzzle #2 - The Clock Shop:
Goal: Use the directions given to locate the clock shop on the map.
Solution: The times correspond to directions as on the face of an analog clock. Follow them to the building labeled H and circle it to select your answer.
Puzzle #3 - Bus Scheduling:
Goal: Select the departure time that makes for the shortest wait for a return bus.
Solution: This one is simple math. Add up the time it takes for the bus to travel and for the work to be completed to come up with 12:00 AM, or Bus E, as an answer. Click on the E to select your answer.
Puzzle #4 - Moving Day:
Goal: Calculate the amount of time it would take the two men to move all seven boxes to the third floor, given the different amounts of time given for each of their trips.
Solution: This is another math one. Calculate each of their trips to come up with 3 minutes as an answer. Write that number in the input answer field to provide your solution.
Puzzle #5 - The Timepiece:
Goal: Determine which panel to press to open the door.
Solution: The panel with the “timepiece” is a hint meant to mislead you. It’s not any of the numbers or hands that overlap the various panels you should be looking for, but the hourglass shape on the top second from left panel. Press that one to solve.
Puzzles 6-10
Puzzle #6 - Needling Needles:
Goal: Determine the number of needle eyes that thread A passes through.
Solution: This one tries to trick you by crossing the threads over one another a lot, but if you use the memo function to trace the path of just thread A, you should be able to count the needle eyes pretty easily to come up with ten as your answer. Submit that number in the input answer field to carry on.
Puzzle #7 - What’s The Time?
Goal: Determine the time on the analog clock that’s lost its numbers.
Solution: The clock hands are pointing directly in straight lines directly across from each other. The only time this ever occurs is 6:00, so write that answer into the input answer field.
Puzzle #8 - The Odd Clock
Goal: Again, determine the time on an analog clock without any numbers.
Solution: Now, the hour and minute hands are overlapping each other. The only time that happens is at 12:00, so write that in and you can move on to the next puzzle.
Puzzle #9 - Cogged Down
Goal: Determine which cog, (A, B, or C) needs to be added to the mechanism to make the gears at either end rotate in the same direction.
Solution: To make gears rotate in the same direction, you want to place an odd number of cogs between them. (Conversely, an even number would cause them to rotate in opposite directions.) Once you know this, it’s a matter of counting which cog, when added, would create an odd number between the two end gears. The answer is B.
Puzzle #10 - What Day Is It? 1:
Goal: Determine which day of the week satisfies the conditions given by the statement in the puzzle.
Solution: Friday is the only day that satisfies the conditions. Check the box under Friday to submit this puzzle’s answer.
Puzzles 11-15
Puzzle #11 - The Professor’s Hat
Goal: Rotate and flip the blocks given into the grid to form the shape of Professor Layton’s Hat.
Solution: I’ll provide this answer in steps:
- First, drag the piece on the far left that’s shaped like an upside down 7 into the top left square.
- Then, rotate the purple L-shaped piece on the far right (By clicking on the corner and dragging in a circle around the piece) 180 degrees, and drag it into the top right of the grid.
- Next, place the green dash to the top right just underneath the purple L.
- Now, flip the light blue piece (by clicking and releasing, then clicking on the “flip” icon that appears and rotate it 90 degrees clockwise. Place it in the bottom left.
- Finally, rotate the yellow piece 90 degrees clockwise and place it in the remaining space. Your solution should look like the image to the right.
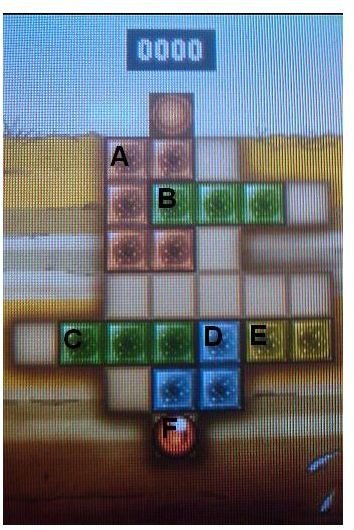
Puzzle #12 - Follow The Arrows:
Goal: Follow the arrows leading from the numbered tiles to the spaces below them, and place the tiles as indicated, but be sure to create a valid equation.
Solution: The correct order is 3+412=5, but that’s obviously not a valid equation. Note that the tiles can be rotated. Rotate the “1” 90 degrees and try again. 3+4-2=5 is a valid equation. Submit that as your answer.
Puzzle #13 - Pick The Pen:
Goal: Determine which of the pen works using the clues provided.
Solution: The clues will lead you to Pen C. Click on that to answer this puzzle.
Puzzle #14 - Find The Station!
Goal: Use the directions given to determine which building the subway station is in.
Solution: Mimic the directions to travel from the school to the library, starting instead at the flower shop. (Exit the building and turn left, then turn left at the second intersection from there. Pass by two intersections and the destination will be on your right.) This will lead you to the building in the top left corner. Circle your puzzle answer.
Puzzle #15 - Boxes of Matches
Goal: Determine the largest number of boxes of matches that could be present in the images shown viewing from different perspectives.
Solution: At most, there are 21 boxes. Write that answer in to solve.
Puzzles 16-20
Puzzle #16 - What Day Is It? 2:
Goal: Determine the day of the week that satisfies the puzzle statement.
Solution: Only Sunday satisfies the conditions given. Check Sunday’s box.
Puzzle #17 - The Messy Note:
Goal: Determine the number on the messily written note.
Solution: It looks like “RHB, but it’s actually “121-113” written too closely together. The answer is 8. Write that in the box in the input answer section.
Puzzle #18 - Slippery Trip 1:
Goal: Travel past the slippery banana peels to the goal. Every peel you step on will slide you forward until you hit a wall.
Solution: This is another solution that will be given in steps:
- First, take one step to the left.
- Then, step down and slide past the banana peel below you.
- Now, take five steps up, to the square just past the banana you just stepped on.
- Take two steps left and two steps down to slide past the next banana.
- Now simply walk to the exit from here. Two steps up, two steps left, three steps up, three steps left, one step down, and one step left. The solution is shown on the right.
Puzzle #19 - Checkerboard Bridge:
Goal: Count the number of possible routes across the bridge that fulfill the conditions given.
Solution: There are fifteen possible routes. Write that answer in as your solution.
Puzzle #20 - Making The Rounds:
Goal: Use the clues given to determine the order the rooms are visited by the doctor and determine which room will be visited fifth.
Solution: The fifth room visited is 63. Circle that answer to continue.
Puzzles 21-25
Puzzle #21 - Medicine Time:
Goal: Measure one fifth out of the odd-shaped medicine bottle and draw a line to indicate that amount.
Solution: You need to draw a line from the top-left corner of the middle square to the bottom right corner of the right-hand square. This is equal to exactly one-fifth.
Puzzle #22 - X-Ray Vision:
Goal: Determine which image on the x-ray the patient should be concerned about.
Solution: All of the images seem pretty awful to find in an x-ray, but notice that most of the images are dark, which makes them non-solid objects likely added to the x-ray (perhaps as a prank.) There is one white circle at the bottom of the x-ray that could point to an object swallowed or something otherwise concerning. Circle that white spot for your answer to this puzzle.
Puzzle #23 - The Secret Number:
Goal: Determine the secret number used to unlock Professor Layton’s car, using only the keys you’ve been given.
Solution: If you place the blue key on top of the gold key and line up their teeth, the spaces in them will align to form the number “47.” Enter that number as your solution.
Puzzle #24 - No-Go Arrows:
Goal: Move along the grid from start to finish, only ever moving from one square to an adjacent square that no arrows are pointing to.
Solution: The easiest way to do this is to work backwards from the exit, moving to each square that no arrows are pointing at. Still, I’ll give the answer from the beginning to make it easier to understand. The solution, from the beginning, is as follows: Down, right, right, down, down, left, left, down, down, right, right, right, up, right, right. Click on each of these squares to select your path.
Puzzle #25 - Back And Forth:
Goal: Determine the amount of hours it will take 12 people to travel from one destination to another using one car that seats 6.
Solution: This one is simple math. Determine the number of trips it will take and add them up. Your answer should be 5 hours. Write that in.
Puzzles 26-30
Puzzle #26 - Upon Reflection:
Goal: Determine which letter of the alphabet is shown in the three images.
Solution: Only one letter would create those exact reflections. The answer is P.
Puzzle #27 - A Game Of Cards:
Goal: Determine which person, in the image of people playing cards, “doesn’t know what he’s doing.”
Solution: Circle the person in the back with the orange hat that has the hand of 4 cards. The way he’s holding them, he’s covering the corners that show the number and suit on a playing card, thus making it so he can’t see his own cards.
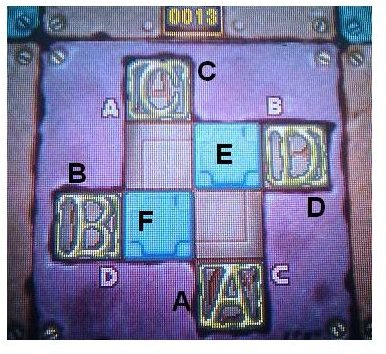
Puzzle #28 - Slot Machine Gun:
Goal: Fit the broken slot machine pieces into the grid to build a machine gun.
Solution: This solution will be given in steps:
- First, select the piece on the bottom right and rotate it 90 degrees clockwise. Place it in the far left of the grid.
- Next, select the piece on the bottom right and rotate it 180 degrees before placing it at the top of the grid.
- Select the long piece at the top right, rotate 90 degrees counter-clockwise, and place it at the far right.
- Rotate the bottom center piece 180 degrees and place it at the bottom of the grid.
- Next, rotate the top left piece 90 degrees clockwise and place it at the bottom right.
- Finally, rotate the top center piece 90 degrees counter-clockwise and place it in the remaining space. The solution is shown to the right.
Puzzle #29 - Our Dream House
Goal: Divide the plot into four rooms of the same shape by drawing lines between the posts.
Solution: The rooms need to be the same shape and proportions, but not the same size. Square off the bottom left corner and the top right corner, and draw a line across the center between them, as shown:
Puzzle #30 - Cookie Conundrum:
Goal: Determine the amount of time it will take for all of the people to finish all of the cookies.
Solution: The solution is four minutes. Enter that into the field to continue.
Puzzles 31-35
Puzzle #31 - False Memory:
Goal: Determine which person is lying.
Solution: The solution is B. If you matched 9 pairs in a game of memory with only 10 maximum pairs, you would have matched the 10th pair by default.
Puzzle #32 - Broken Lance:
Goal: Determine which lance in the photo has been broken and repaired with rope.
Solution: The lance at point C does not draw a straight line if you trace it behind the suit of armor. It’s the broken one. Sometimes, when playing Professor Layton, puzzle answers that seem almost too simple really are that simple. Don’t over think obvious solutions.
Puzzle #33 - Brothers N’ Sisters:
Goal: Determine the smallest possible number of siblings in a family that would satisfy the conditions given.
Solution: The smallest solution to satisfy the conditions is 6. Write that in as your answer.
Puzzle #34 - The Mysterious Memo:
Goal: Determine the meaning behind the strange note.
Solution: 101X5 (which equals 505) was left next to a calculator, indicating that you should do the math. 505 looks suspiciously like “SOS,” which is the message that was intended.
Puzzle #35 - Twisted Tunnels:
Goal: Of the three tunnels, determine which one (A, B, or C) would need to go above ground to connect all the way to the its end point.
Solution: The only tunnel that doesn’t connect underground is C. It would need to go above ground.
Puzzles 36-40
Puzzle #36 - Hide-And-Goon-Seek:
Goal: Count all the goons in the image by moving around your narrow field of vision.
Solution: There are a couple of them that pop up and down from behind buildings that are easy to miss if you’re not careful. In total, however, there are nine goons.
Puzzle #37 - Cat Romance:
Goal: Chart a path for Catanova to his sweetheart that passes by the neighborhood dogs unhindered and choose which point he should enter from for this to be possible.
Solution: The only entrance that can pass by all of the dogs is C.
Puzzle #38 - Cluttered Bag:
Goal: Slide the gem from the bottom of the bag to the top, moving past all of the clutter.
Solution: The solution is as follows, step-by-step. Important pieces are labeled in the image to the right.
- First, slide the blue green L-shaped piece (piece A) in the center up one square.
- Then, slide the brown T-shaped item (piece B) in the top right up on square and left one square.
- Slide the blue L-shaped item that was below that piece (piece C) up one.
- Slide the red garnet (piece D) up two spaces, right two spaces, and down one space.
- Slide the blue L-shaped item above it down on space and left two spaces.
- Slide the red garnet up one space, right one space, and then up three spaces to the top right corner.
- Slide the blue L-shaped piece two squares to the right.
- Now, slide the blue green L-shaped piece down one.
- Slide the brown T-shaped piece down one square.
- Finally, slide the red garnet left three squares and up to the exit.
Puzzle #39 - Coat Confusion:
Goal: Determine which of the four people (A, B, C, or D) is mistakenly wearing the coat that belongs to D.
Solution: C is wearing D’s coat.
Puzzle #40 - Missing Tiles:
Goal: Plug in four tiles that make a valid equation in both directions.
Solution: Because one equation is the opposite of the other, as long as you have the right pairs of tiles, it doesn’t matter what side they’re on. 2 and 3 need to be on one side, and 5 and 1 on the other side. Any combination of those will work. (2351, 1532, 5123, etc.)
Puzzles 41-45
Puzzle #41 - Carrying Glasses:
Goal: Determine which type of glass (A, B, C, or D) would be the hardest work to carry around in large amounts.
Solution: B is the only stackable glass, which means you could carry far more of them at once, making a single trip much harder work. The solution is B.
Puzzle #42 - Create The Key:
Goal: Fit the pieces of Professor Layton’s Hat from the earlier puzzle into a different grid to instead create a key shape.
Solution: The solution is as follows:
- First, remove the green dash piece, rotate it 90 degrees, and place it on the far left.
- Then, take the blue piece from the bottom left, flip it, then rotate it 180 degrees, and place it at the far left just beside the green piece.
- Next, take the yellow piece from the bottom right and drag it to the left of the key grid without flipping or rotating at all.
- Take the purple L-shaped piece from the top left, rotate it 180 degrees, and place it in the bottom right.
- Rotate the last piece 90 degrees clockwise and place it in the remaining spot. Your solution should look like the image on the right.
Puzzle #43 - Making The Cut:
Goal: Cut the wood into two pieces that can be fit together, without flipping or rotating, to make a square.
Solution: Move three in from the top right and cut one down, then one right, then one down.
Puzzle #44 - Find The Clock Tower:
Goal: Use the directions to determine which letter corresponds to the clock tower on the map.
Solution: The directions only make sense if you start from A facing downwards, which will lead you to H. The clock tower is at point H.
Puzzle #45 - How Many People?
Goal: Determine how many people were in the bus based on the clues.
Solution: Like any good Professor Layton, puzzle answers in this game are meant to trick you as often as possible. Don’t forget the tour guide and the bus driver. The solution is 37 people.
Puzzles 46-51
Puzzle #46 - A Heartfelt Heart:
Goal: Determine which of the three men (A, B, or C) presented her with a heart.
Solution: The magazine A is holding can be folded into a heart shape. A is the solution.
Puzzle #47 - The Shady Trio:
Goal: Determine what color each article of clothing on each member of the trio should be.
Solution: The leftmost member of the shady trio should be wearing a white hat, a red shirt, and green pants. The center member a green hat, a red shirt, and white pants. Finally, the member on the right should be wearing a red hat, a green shirt, and white pants.
Puzzle #48 - 1/1000:
Goal: Drag one match into the garbage to create a number that is 1/1000th of the current number.
Solution: Dragging the far right match of the second zero will change the number to 10 CM, which solves the puzzle.
Puzzle #49 - The Missing Block:
Goal: Determine which block (A, B, C, or D) is missing from the set of oddly shaped blocks.
Solution: If you look closely, you’ll see that the blocks are all letters, just spun strangely, and that they spell Layton, minus the O, which is Block B. That’s your solution.
Puzzle #50 - A Dangerous Place:
Goal: Determine which of the named locations has the highest average of injured people and deaths per year.
Solution: This one is trying to trick you. As dangerous as many of the locations named are, the solution is the hospital. Circle that and you’ve solved another puzzle.
Puzzle # 51 - Park The Car:
Goal: Determine the path needed to park the car based on the conditions given: that you must turn at all Xs, and you must go straight through Os.
Solution: From the start go left two squares, then up two squares, left one square, up one square, and then right six squares before going up one more, left one, down four squares, right one square, up one more square, left four squares, and finally up one final square to the exit.
This post is part of the series: Professor Layton and the Unwound Future Puzzle Walkthrough
Stuck on a puzzle in the most recent entry in the Professor Layton series? These articles will walk you through the solution to every single puzzle in the game, including all of the available bonuses, and all of the weekly downloadable puzzles. Read on for all the answers you’ll need.
- Professor Layton And The Unwound Future Puzzle Walkthrough Part 4
- Professor Layton And The Unwound Future Puzzle Walkthrough Part 3
- Professor Layton And The Unwound Future Puzzle Walkthrough Part 2
- Professor Layton And The Unwound Future Puzzle Walkthrough Part 1
- Professor Layton And The Unwound Future Puzzle Walkthrough Part 5