The Nintendo 3DS has a wealth of awesome, Internet-based, features for players to enjoy. In order to do so, you’ll first have to set up your wireless connection. Our step-by-step guide will help you do exactly that.
Nintendo’s 3DS is the newest handheld capturing the imaginations of gamers everywhere . With true glasses-free three-dimensional gaming, there’s plenty to love about Nintendo’s successor to the DS.
One great feature of the 3DS is its Internet connectivity. This is not the Nintendo that ignored online functionality with the Gamecube. Instead, they’ve embraced it, offering online play in many of the system’s launch titles and a full selection of downloadable content through the eShop.
In order to access this online content, you’ll first need to connect your 3DS to your home wireless network. Our guide will walk you through the process step by step.
Step 1: System Settings
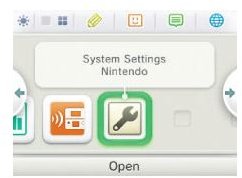
First thing’s first: power on your Nintendo 3DS and head over to the “system settings” menu (icon is a giant wrench). Select it and you’ll find yourself in the System Settings Menu.
Here you have four choices: Internet Settings, Parental Controls, Data Management, and Other Settings. You will want to select Internet Settings.
Inside the Internet Settings menu there are several options, but if you’re connecting your system to a standard wireless network, you’re going to want to hit the big blue button that says “Connection Settings.”
Atop the Connection Settings screen is a big white button that says “New Connection.” Press it and you’ll be asked if you’d like to run your setup manually or enter a tutorial. Since you’re using this guide, you have everything you’ll need to know to proceed manually, so choose “Manual Setup.”
Step 2: Connect to Your Wireless Network

For the purpose of this walkthrough, we’re going to assume you’re connecting your 3DS to a standard router. If you have an AOSS compatible router you can continue by pressing that button. If you have no idea what AOSS is, feel free to continue with the steps here in the guide.
Before we can connect to your wireless router, we first have to find it. To do so, select “Search for Access Point” on the “Connection Settings” screen.
You’ll be presented with a list of local wireless networks. The number will vary depending on how many neighbors you have. Those in apartment complexes may have to search through quite a few, while those who live in a secluded area will probably only have their own network to choose from.
Either way, find the name of your network and click on it to continue.
If you have previously set up a network password, you’ll need to enter it now. You can find your password by accessing your router from any computer that is already connected. Check out the instruction manual or website for your particular router manufacturer for information on how to do this.
If you have your password ready to go, enter it now and click “OK” to continue. Using the stylus is best here, as the individual characters on the keyboard are very small.
Once you’ve entered the password, you’ll be asked if it’s okay to save the connection as Connection 1, 2, or 3. Click “OK” to confirm and continue.
The system will inform you that it is about to begin a connection test, press “OK” to allow it to do so.
Step 3: Test Your Connection
If your connection test is successful, you’ll receive a message confirming that it worked. If it’s unsuccessful, you’ll be given the opportunity to reconfigure your settings. Make sure that you have entered your network password correctly, as this is most often the cause of a failed connection.
Once your connection is successfully configured, hit the “Back” button on the screen to return to the previous menu. Do this twice and you’ll be given the option to close the system settings menu. Do so, and you’ll find yourself back at the “Home” screen.
Step 4: Check Out Online Content

Now that you’re connected, you can check out the great content available in the 3DS eShop, including Pokedex 3D and 3D Classics: Excitebike, both free of charge for a limited time. You can also download 3D movie trailers, purchase classic games for the Virtual Console, or battle your friends online in Super Street Fighter IV 3D Edition .
Now that you’re connected, you can also activate the “Spotpass” function. To use Spotpass, simply leave your 3DS in sleep mode (close it, but don’t turn it off) anywhere it can access a connection to the Internet. Your system will automatically receive data from Nintendo, everything from system updates to new demos and trailers playable on your system.
Certain games will also utilize Spotpass functionality. Pokedex 3D, for example, will occasionally receive new pokemon through the service, and games like Dead or Alive: Dimensions will receive in-game content like new costumes for fighters.
Now that you’re connected, you can really enjoy all that your new handheld has to offer.