Coma is a very surreal and odd game that combines some basic puzzles with platforming. There are a few sections of this unique game that require a very “unique” logic though. If you find yourself lost while playing Coma, searching for the Dore Bell in Coma, then just look here for help.
Introduction
Coma is a pretty interesting game that offers an artistic story in a surreal landscape. Parts of Coma are fairly difficult though and its surreal nature requires some very “unique” logic. This Coma Walkthrough will cover how to get through the level, how to make it out of the dark basement of the house and how to ring the Dore Bell and end the game.
As a side note, if you like Kongregate games , then we have several other guides and reviews. Fans of Coma may also want to give The Company of Myself a quick look. It’s a similar game.
Coma Walkthrough - A Short Walk
Well, this is pretty easy for now. Just walk out of the house and get used to the controls. This is the training area, so get used to jumping and running. Exit the home and free your bird. He’ll stay with you for the rest of the game and he’s pretty useful. Keep walking and pass the fisherman. It seems that this frightening figure is your father. He’ll talk to you as you walk away and ask you to find out what’s clogging the pipes.
Note that you have to agree to fix the clog. If you say no then he just threatens to kill you, which makes you say yes anyway.
Coma Walkthrough - Fixing the Clog
Walk further to the right and look at the slope to the right. You need to jump up to that slope. You can use the objects here as platforms. First use the large block on the ground. You can then jump up on the power boxes on the wall. It’s a small platform, so be careful. Then jump onto the pillar holding the wheel by the pipe. You should be able to make it up to the hill now.
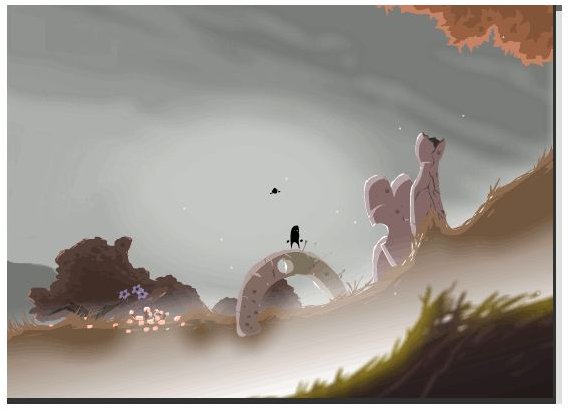
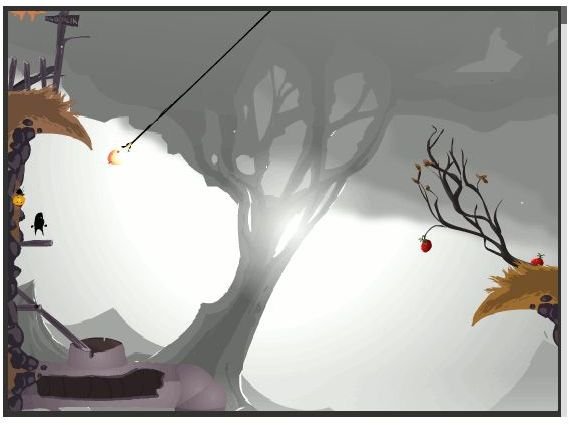
This officially takes us to Redwind Fields. Just keep going right for now and take it all in. We’ll explore this place a bit more in a minute. For now, just walk along. Jon will tell you all about Shill Bend. We’re going there later in this Coma Walkthrough, so don’t worry about it now. In order to get past the rocks, you need to jump onto the arch and use that to get on top of the pillars. The little guy swinging on the weird vines is also just a clue for later. We’ll do our swinging in another few minutes.
You should arrive at the pipes at this point. The hill is still blocked off, so drop into the pipe and walk left until you meet Fatty Pancakes. He has bloated up and we need to pop him to open up the pipes again. Just run back to your father to report the problem. He’ll give you his fishing hook to go back and pop him.
*Note - Make sure that Bird actually grabs onto the hook. Jump at it a few times to make sure he gets ahold of it. Walk back to Fatty Pancakes and you should automatically pop him and free up the water full. This also opens up our path.
Coma Walkthrough - The Worm in Silver Shute
You can’t go over the board blocking your path, but you can go through the pipe past Fatty Pancakes. Walk past him and look out the pipe. Note that you can’t grab onto the vine. That’s what the other guy swinging on the vine tried to tell you. You need to get magnetized to the plants before you can swing on them. So let’s do that. Drop down the pipe or jump down the big hole in the ground to enter The Silver Shute.
Walk to the left and you should find a swing light. Jump up to make Bird grab it. He’ll light the way for you from now on. You should be safe just walking to the left. If you get caught on a vine, just jump to get unstuck. Walk up to the big worm and step inside his month. It’s safe (and technically he’s your friend). Walk through his guts and jump out the hole to end up back in Redwind Fields (Yes, that weird orange “eye” is not an eye).
Make sure that Bird picks the glowing fruit back up and walk back to the pipes. You should notice that the swinging vines along the way follow your movement now. Climb back through the pipe and jump out through the hole. You can’t reach the hanging fruit vine from this spot, so look to the left. There are a few small wooden platforms that you can climb up. Jump up to the top (consult the picture if you have trouble finding them) and jump onto the fruit. Don’t try to control this one. You’ll probably just kill the momentum. Just leap off to the right and land on the other side.
Walk into the shadowy area to continue your search.
Coma Walkthrough - Shill Bend
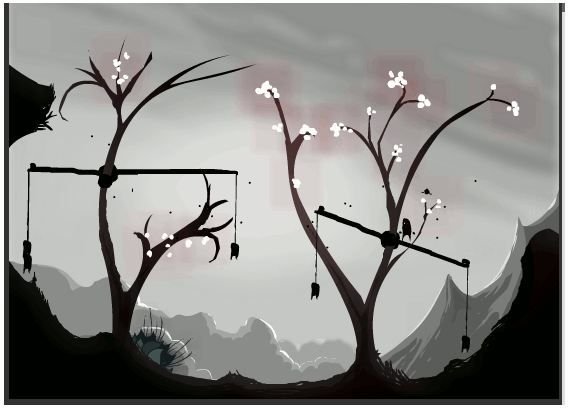
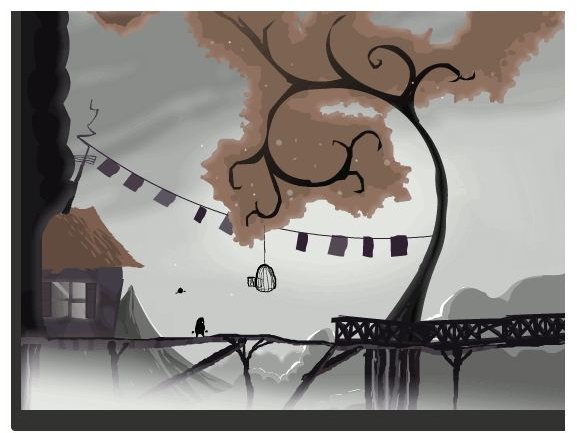
Okay, we’re just exploring for the time being. Walk into the dark forest to enter Shill Bend. Just like Jon said, right is left and left is right. Up and down aren’t reversed though. Walk across the first section to reach what appear to be gallows. You need to get across to the hill, so jump onto the first one and ride it down enough to tilt up the left side. Jump onto the next set of gallows and ride the right side down again to create an incline up onto the hill.
The controls shouldn’t be backwards anymore, so just move to the right. Take a moment and watch the creature playing the song. Make a note of the song notes (DEBAB). We’ll need that in a second.
Keep going and jump onto the trampoline. Just wait a moment. You’ll get higher and higher with each jump. You need to go up a full three screens to reach a dark cloud with some flowers. Hold down the Left key to drift over to the cloud and land on it. Walk to the left to meet Mama Gombossa. She’ll warn you about ringing the Dore Bell (the engravings in the worm told us to ring it, in case you didn’t catch that) and send you back to meet her son. Note that he was the one who was swinging on the vines. We need to backtrack again. Just walk back to the Silver Shute and go through the worm. Then walk right to find her son.
He’ll explain how to play the game. You just need to get “jump seeds” by jumping on those fruits that look a bit like big strawberries. Jump on the big one to the right and then walk back to the left. Jump on all five in the field and you should be flying high enough for our needs. Run all the way to the left and go back to your father. You can now jump high enough to go back onto the dock and head back home.
Coma Walkthrough - Dore Bell
We’re almost done here. Move on back to the house and to the far left. Remember the piano that was here at the very start. Step onto it and go ahead and play it. Remember that toon the creature was playing, and Bird said that it was your sister’s song, well play it.
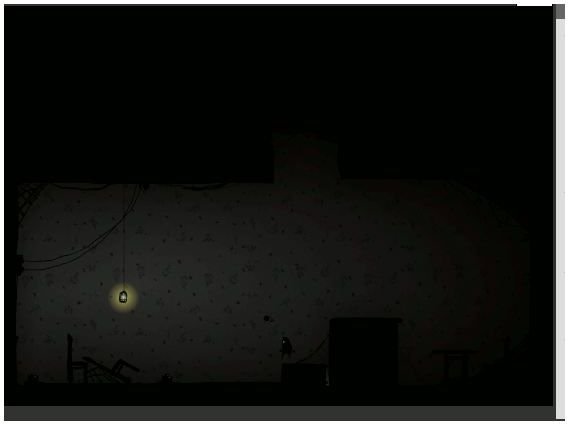
Just hit, DEBAB and a trap door will open up. Drop down into the light to enter the secret basement. This is probably the biggest problem for people. You see, there are these small “switches” that you trigger by walking into them. You need to trigger them to move forward.
The first two are on the floor to the left. The third is on the ceiling above the light. HIt it and the junk will move to expose another trap door.
The next area is a bit more weird. Those blobs aren’t a threat. They do make it a bit harder to actually find the switches though, since it’s pretty dark. Walk right into the first switch on the ground by the blob to trigger it. Then walk to the right and across the bridge. Walk over the switch on the ground. Head back to the bridge and it should collapse. Drop down and walk across the blobs. The next switch is on the ceiling. Use the blob as a platform and jump up to touch it. This will open up the blobs.
Drop down to reach a ship at the bottom. All you have to do now is jump up on the ball on the mast and then touch the glowing light to ring the Dore Bell and complete the game.
Hopefully this Coma Walkthrough helped you ring the Dore Bell. If not, try turning up the brightness to be able to see the switches easier.