While on the quest for the Garage Code, you’ll be sure to get lost in the Robinson’s Estate. So be careful, watch your step and always have this walkthrough ready!
Grandpa Bud for the win?
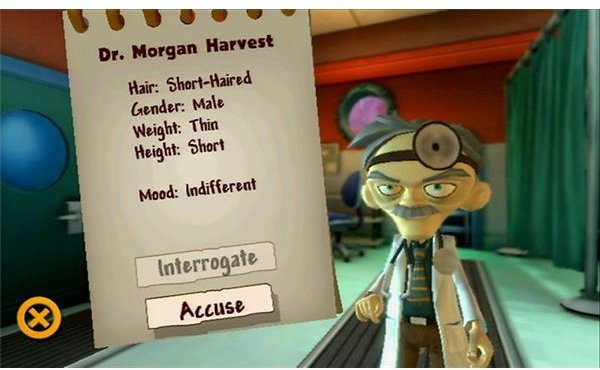
Leave the lab by going down the stairs, and try scanning the zumzat you’ll encounter along the way. In case you’re wondering, the zumzat is that bouncing purple thing that serves as good target practice. Head to the garage door (near Franny) and use the scanner on the keypad. The scan will reveal that the last person who used it was Grandpa Bud. Great, more crazy people. Your mother will then tell you that she last saw Grandpa Bud in the dining room. Scan your mother and head over to the dining room (the door with the spoon and fork). You’ll see Grandpa Bud there. Of course he won’t (or can’t) give you the garage code right away. You have to help him find his teeth! Wilbur has a hunch it’s Franny’s singing frogs again, and decides to head over to search the music room while Grandpa searches the peanut butter. The music room will now be unlocked, so proceed there. Cousin Laszlo will contact you and a pop-up window on Flip Targeting will appear. Scan all the frogs in the room, that’s Freddy, Fabian, Ferdinand, Francis and Floyd. A sixth frog will then appear, Frankie, who has Grandpa’s teeth. Grab them and head back to the dining room. Talk to Grandpa, or scan him too first.
Following Granpa Bud
As expected, Grandpa Bud fails to give an answer as to what the garage code is. He tells you to go see Uncle Art, who is probably outside near his space ship. While heading there, you may want to explore the house and scan some more things, such as the Robinson Aid Station, the Robinson TV, or even the weirdos Spike and Dimitri. When you’re done exploring and scanning stuff, exit the house and head into the yard. Uncle Art will be there in a Protecto Sphere. Scan the Protectosphere Generator, then pop into it.
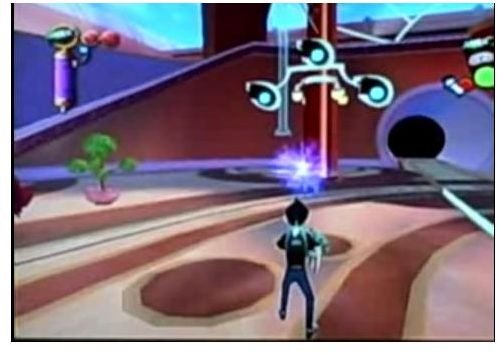
This will initiate a race-like mini-game similar to Super Monkey Ball, but with no monkeys. You will have to maneuver through the obstacle course while inside a Protecto Sphere. Roadkill zumzats are alright, thank God. Some parts will require a bit of patience, like the jump-panels. At the end of the course, you’ll see Uncle Art and his space ship, the Anchovy Saucer. Scan them both, then talk to him. Like most video game characters, Uncle Art needs help of course. And the next task involves rounding up some of those pesky purple critters: zumzats. Good thing a concentrated electric charge can stun them. Time to grab your Charge Glove.
Misdirection, My Crafty Mistress

Take the transport tube to your room. Grab the Charge Glove and a tutorial game on Chargeball, a mini-game, will appear. The tutorial is a 1 point game against a trainer. All you have to do is break all his bricks (blue ones) before he breaks yours (red ones). After the tutorial, you have the option to try the Peewee Court and the Varsity Court before leaving Chargeball. Once you exit the minigame, a tutorial pop-up on your new gadget will appear.
Now is the time to round up those zumzats. There are 5 large ones in the house: inside Wilbur’s room, in the hall outside Wilbur’s room, in the dining room, the kitchen, and the living room. Try targeting the zumzats from a distance so that they don’t bounce away from you in a hurry. Zapping a zumzat with the Charge Glove will turn them into 3 smaller zumzats which you can collect by just running over them. Once you get them all (15 in total), take the nearest transport tube to the Yard, where Uncle Art is.
Going Round in Circles
Another quest completed, and another redirection. Uncle Art tells you to go see Aunt Billie, who is at the train room. Go to the transport tube and see that you now have access to the train room. Head there and talk to Aunt Billie. Big surprise, she needs help. She’ll ask you to recharge her train. A tutorial pop-up on your Charge Glove’s alternate mode will appear. Before charging the poles, scan Aunt Billie, her train and one of the blue circles on any of the poles.
If At First You Don’t Succeed
Proceed to charge all the poles using your Charge Glove. When you’re done, power will be restored to the train. Return to Aunt Billie, who is grateful that she can put things “back on track.” And as expected, she knows nothing of the garage code, and tells you to go see Uncle Gaston at the cannon range.
Take the transport tube to the dining room and go outside. Try to enter the cannon room, a message will tell you that you can’t enter because you need a key. Head to the Lab and talk to your crazy cousin Laszlo. He’ll tell you that you need an Extendo-Key which you can build using parts gathered by your Disassembler. You’ll receive the blueprint, and information about rare components. The rare component for the Extendo-Key is skeleton alloy. Laszlo will mention seeing a new chest in the storage room. You know what that means. Take the transport tube to the storage room. There are two new chests here, at opposite sides. One contains an action figure, the other contains the skeleton alloy. Once you get the rare component, continue disassembling stuff until you get enough components for the Extendo-Key.
Try Try Again
Once you get all the necessary components, head back to the Lab and use your handy-dandy Transmogrifier to build the Extendo-Key. Now you can open the cannon room. Leave the Lab and head there. Once inside, you should see Uncle Gaston. Use your scanner on him. If you have scanned all members of the family, you should receive 8 action figures as a bonus. Uncle Gaston will tell you that he changed the garage code (finally, right?). But before he gives it to you, you have to complete his cannon challenge. What you have to do is reach the circle without getting hit by flying meatballs. Sounds simple enough. This is basically a tutorial on dodging, as the pop-up windows will show. Complete Gaston’s challenge and receive the code for the garage. It’s about time! If you haven’t realized, you had to undergo the basic mechanics of the game just to get the garage code, and to progress in the game.
Exit the cannon room and head to the living room, where the garage door is. If you’re health bar isn’t full you may want to use the nearby aid station. Open the garage door to finally complete this part of the game.
Robinson Basement

After the cutscene, you’ll find yourself in a whole new area: the Robinson Basement. Head to the Reception Area until you see a gray box on the wall. Scan it, and you’ll see it’s the Robinson Power Box. Also, scan the Robotic Receptionist. Use your Disassembler on the power box to open it, then hit it with your Charge Glove to power up the receptionist, and to open the doors behind her.
Enter one of the doors until you reach a hallway being scanned by lasers from the ceiling. I know right, what a basement. Use your scanner on one of the ceiling lasers. Climb the vases to reach the ledges to avoid the Laser Scanners. On the left side of the hall is a door with two chests inside. Disassemble them for components. On the opposite side is another door and another chest with concept art inside. Climb back up another vase to reach the ledge to bypass the scanners. From the ledge you can scan the following things: Camera Bot, Robinson Hand Scanner, Time Lab Door, The Prototype Time Machine, and Lev Turret. Get down from the ledge and try to enter the Time Lab. Big surprise, you’re not allowed inside.
Use your Charge Glove on the Camera Bot until it’s destroyed. Zep the Lev Turret too, but move around to avoid its attack. Once both are down, the force field will be deactivated. Head down the stairs and you’ll see a large aquarium. Scan the machine by the aquarium window; it’s a Water Dispenser. A robot will come out to repair it, you can scan him as well. Enter the door where the Maintenance Bot came and go up.
This post is part of the series: Meet the Robinsons Walkthrough
This is the walkthrough for the Disney PC adventure game, Meet the Robinsons!